AVR Studio:In the last chapter, we gave a brief introduction of the AVR Studio. Now in this, we will deal with the how to write/ create project in the AVR.
Before Going Through this one, I am requesting you to go through the Previous Chapters:
- Chapter 4: Inside The Embedded System, Number System, and AVR
- Chapter 3: Brain Behind Embedded System , AVR
- Chapter 2: Microcontroller and Microprocessor : Starting From the Base
- Chapter 1: Introduction of Robotics, Law, History & Embedded System
So, to make the project in the AVR, first of all, we have to install the AVR software in our PC. There are various versions of AVR is available such as AVR Studio 4, AVR Studio 5, AVR Studio 6 etc. In different windows (windows 7, 8, 9.1, 10) there is a different method to download the AVR Studio software.
In Windows 7 the installation process is simple. You have to download the AVR Studio software and will be easily installed in PC. While for other windows like 8, 8.1,9,10 there is a different method to install the software.
To install the software in these windows you need to first disable your malware protection because if it is enabled on your PC then it continually interrupts your installing and also the installation is time-consuming. once it installed you can again enable your malware protection.
In windows 10 after installing it you need to set the path for it. Once the above all process is done your AVR studio application is completely installed and you can start work on it.
How To Create Project in AVR Studio
For AVR Studio 5
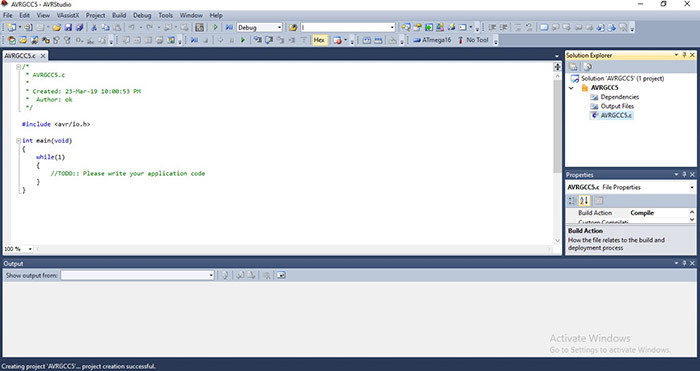
- Open the software on your desktop/ PC.
- Then go to the file option which is available at the top left corner.
- click on it, and tap on New
- On clicking on new two option will be provided i.e. Project and File.
- Select project.
- After selecting it, choose the“ AVRGCC C Executable Project”.
- Now, name your project (any name which you want to give).
- After that click on “OK” button.
- On clicking on OK a window appear name as device selection.
- Under that select the ATMega 16. (You can choose as per Your Choise)
- After selecting it, click on the “ok” button.
- Your project is now created.
- Now write your code in the space provided to you.
- Output can be obtained by these simple process: Check Here
AVR I/O Registers
While designing applications using microcontrollers, we need to know only two things:
- How to get output from the microcontroller and
- How to read an input given to the microcontrollers?
The answer of these two questions can be answered by the understanding of three registers:DDRX, PORTX and PINXregisters, where’X’ represents the PORT of the microcontroller. In ATmega 16, this ‘X’ can take ‘A’, ‘B’, ‘C’, or ‘D’. Thus, the I/O registers corresponding to port C are DDRC, PORTC and PINC and similarly for others ports.
DDRX (Data Direction Register)
This is an 8-bit register associated with 8 I/O pins available in the microcontroller. Thus the number of DDR registers in the microcontroller is decided by the number of ports available in the microcontroller.
Ex: ATMega 16 has 4 ports so it has DDR registers associated with each port (A, B, C, D).
This register decides the direction of the I/O pin i.e. either output will be given from that pin or input will be read. ‘0’ represents the corresponding pin will act as an input while ‘1’ represent the pin will act as an output.
So, if you write DDRA=0b11010001, then the 8 I/ O pins of PortA will have the direction as shown in the figure below.
PORTX Register
For the chosen of pin as output by DDR register, the value of output is decided by the PORT register of that port.
PINX Register
In case of the pin chosen as input by the DDR register, the value provided by the input device is available in the PIN register. The microcontroller reads the PIN register to get the input device.
To Check Output of The Program
- After writing the code go to the“build”option or press f7 to compile your program.
- Once your program is compiled you can put your program/ Code for the simulation process.
This all for this chapter. In next we will deal with the interesting topic like LED, SSD, LCD etc. So now get ready to deal with the coding part of the embedded system.